Showing posts with label Widget. Show all posts

Friday, 27 July 2012

Adding Translator Widget To Blog With Flags

With the development of this modern era education has much developed much and is still developing. One of the form of development is language. There are numerous language till now and more are evolving much.
As an active and famous blogger your blog might be famous worldwide. It's probable that you use English language to write posts. It's alright for the people who understand English but for those who don't understand english what to do?
Though english is a worldwide language and blogger is itself in english language by default there are some people in the corners of this world who don't know english. For them what to do. If we soon don't think of the solution for this then soon they will be leaving our blog and we will be loosing a unique visitor which is a minus point for us.
Realizing this problem i have written this post to assure you that your problem is not fixed. Today in this post i will be teaching you the simplified way of adding translator with flags. This tool will translate every page of your's into the language desired by your users and by this they will be certainly be visiting your site and your blog will become spreaded worldwide as it is now understood by every people of this world. Here we go then;
  • Login to your blogger account.
  • Be forwarded to dashboard and then to layout.
  • There click on Add a Gadget .
  • Scroll down and click on Html/Javascript.
  • Now copy the following code;
<!-- Translate flag BEGIN by blogging sentral --> 
<style type="text/css"><!-- If you're getting validation error, put this style sheet to head -->
.trans-flags{margin: auto; width:auto; text-align: center;}
div.attribution {font-size:8px;text-align: center; width: auto;}
img.flag {cursor: pointer; height: 24px; width: 24px; border: 0;-webkit-transition: all .2s linear;-moz-transition: all .2s linear;-o-transition: all .2s linear;transition: all .2s linear;}
img.flag:hover {-moz-transform: scale(1.2);-webkit-transform: scale(1.2);-o-transform: scale(1.2);-ms-transform: scale(1.2);transform: scale(1.2);}
</style>

<div class='trans-flags'><a rel="nofollow" onclick="window.open('http://www.google.com/translate?hl='+'en&amp;sl=auto&amp;tl=zh-cn&amp;u='+encodeURIComponent(location.href)); return false;"><img class="flag" alt="&#20013;&#25991;(&#31616;&#20307;)" src="http://lh6.ggpht.com/_dzq0x75P67s/Sqodh0eQlGI/AAAAAAAAAnI/qeNNDV5ZsIQ/s800/China.png" title="&#20013;&#25991;(&#31616;&#20307;)" /></a> <a rel="nofollow" onclick="window.open('http://www.google.com/translate?hl='+'en&amp;sl=auto&amp;tl=pt&amp;u='+encodeURIComponent(location.href)); return false;"><img class="flag" alt="Português" src="http://lh6.ggpht.com/_dzq0x75P67s/Su6pkl4lNCI/AAAAAAAAAto/-lLpHw3dd-c/s800/Brazil.png" title="Português" /></a> <a rel="nofollow" onclick="window.open('http://www.google.com/translate?hl='+'en&amp;sl=auto&amp;tl=en&amp;u='+encodeURIComponent(location.href)); return false;"><img class="flag" alt="English (US)" src="http://lh4.ggpht.com/_dzq0x75P67s/SqofSt9T9YI/AAAAAAAAAno/fEk669hIv4Y/s800/United%20States%20of%20America%28USA%29.png" title="English (US)" /></a> <a rel="nofollow" onclick="window.open('http://www.google.com/translate?hl='+'en&amp;sl=auto&amp;tl=fr&amp;u='+encodeURIComponent(location.href)); return false;"><img class="flag" alt="Français" src="http://lh3.ggpht.com/_dzq0x75P67s/Sqodh1SZl4I/AAAAAAAAAnM/75d_mi391cM/s800/France.png" title="Français" /></a> <a rel="nofollow" onclick="window.open('http://www.google.com/translate?hl='+'en&amp;sl=auto&amp;tl=de&amp;u='+encodeURIComponent(location.href)); return false;"><img class="flag" alt="Deutsch" src="http://lh4.ggpht.com/_dzq0x75P67s/SqodiEO5DFI/AAAAAAAAAnQ/Zg3lznR_xxQ/s800/Germany.png" title="Deutsch" /></a> <a rel="nofollow" onclick="window.open('http://www.google.com/translate?hl='+'en&amp;sl=auto&amp;tl=it&amp;u='+encodeURIComponent(location.href)); return false;"><img class="flag" alt="Italiano" src="http://lh5.ggpht.com/_dzq0x75P67s/SqodiCj-k-I/AAAAAAAAAnU/uBITDoMVy3U/s800/Italy.png" title="Italiano" /></a> <a rel="nofollow" onclick="window.open('http://www.google.com/translate?hl='+'en&amp;sl=auto&amp;tl=ja&amp;u='+encodeURIComponent(location.href)); return false;"><img class="flag" alt="&#26085;&#26412;&#35486;" src="http://lh4.ggpht.com/_dzq0x75P67s/SqodiHC9jHI/AAAAAAAAAnY/7EizWdCnn4s/s800/japan.png" title="&#26085;&#26412;&#35486;" /></a> <a rel="nofollow" onclick="window.open('http://www.google.com/translate?hl='+'en&amp;sl=auto&amp;tl=ko&amp;u='+encodeURIComponent(location.href)); return false;"><img class="flag" alt="&#54620;&#44397;&#50612;" src="http://lh3.ggpht.com/_dzq0x75P67s/SqofSY4TTlI/AAAAAAAAAnc/gL6lLQqO2-U/s800/South%20Korea.png" title="&#54620;&#44397;&#50612;" /></a> <a rel="nofollow" onclick="window.open('http://www.google.com/translate?hl='+'en&amp;sl=auto&amp;tl=ru&amp;u='+encodeURIComponent(location.href)); return false;"><img class="flag" alt="&#1056;&#1091;&#1089;&#1089;&#1082;&#1080;&#1081;" src="http://lh6.ggpht.com/_dzq0x75P67s/SqofSVz2JhI/AAAAAAAAAng/opgmwbgvnDU/s800/Russian%20Federation.png" title="&#1056;&#1091;&#1089;&#1089;&#1082;&#1080;&#1081;" /></a> <a rel="nofollow" onclick="window.open('http://www.google.com/translate?hl='+'en&amp;sl=auto&amp;tl=es&amp;u='+encodeURIComponent(location.href)); return false;"><img class="flag" alt="Español" src="http://lh6.ggpht.com/_dzq0x75P67s/SqofSuXVoYI/AAAAAAAAAnk/bM3PAPvu6vo/s800/Spain.png" title="Español" /></a></div>
</ul><span style="font-size: 80%; color:#999999; float:right; margin-right:20px;"><a href="http://bloggingsentral.blogspot.com/2012/07/adding-translator-widget-to-blog-with.html">Get this translator</a></span>
<!-- Translate flag end by blogging sentral -->
  • Now paste the above code where ever you like the translating flag to appear.
  • Enjoy your new widget.
  • CHEERS!!
I hope you enjoyed this post. Be sure that you comment below;

Free Colour Code Generator Tool

Colours have a very great importance in every body life. You all might already know the value of colour is worth counting. So colour are used every where. Even in blogosphere to male our website colorful we use numerous colours.
But while adding colours to our blog we cannot use the name directly. Each colour has it's own code. We should use that. But there's a problem the codes are different for each color and colors are numerous so are the codes. What do you do now? 


We cannot save the codes in our brain memory. SO to fix that problem here's the colour code generator for you.
Feel free to use this tool and share it; Here are some instructions. Be sure you read them;

  • Initially drag the the pointer in Hue to your desired colour palate.
  • Then drag the pointer inside the brightness/saturation box and choose your desired colour.
  • You can yourself set brightness/hue/saturation by changing their value.
  • Now your code is generated in hex box.
  • Simply copy the six digit code. Eg:#000000
  • Enjoy!!

But if you want to choose matching colour palates then try using another tool below;
Colour Wheel For Matching Palates Colour
In reference to the tool above, this tool is extremely helpful for choosing your desired colour for your backgrounds, sidebar, header, hyperlinks and much more.INSTRUCTIONS;
  • Click on a colour palate and the four matching colour will appear along with their hex codes.
  • More over you can enter a hex code and it's marching colour codes will appear.
  • Copy the code of the colour you liked and start using them;
I hope this tool was useful for you. Feel free to use it and share it with your friends and families.
ENJOY!!

Thursday, 26 July 2012

Table Of Content / Sitemap Generator For Blogger

This is also another great widget for your blog.
It automatically generate table of content in your
blog.Its a site map. Your visitors can look at
complete structure of your blog.it will show
"New!!" as latest 10 posts. Actually this is
more important in Seo. you better add this
widget to your blog.

Table Of Content Sitemap

Demo

How to add it to your blog.
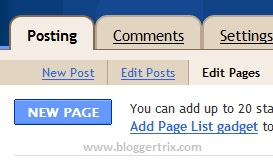
1. Log in to blogger account and Go to Posing>> Edit Page >> Create Page


2. Now paste below code

<script src="http://www.abu-farhan.com/script/daftarisiblogger/blogtoc-min.js">
</script>
<script src="http://bloggertrix.com/feeds/posts/default?max-results=9999&amp;alt=json-in-script&amp;callback=loadtoc">
</script>

*Replace Bloggertrix.com with your blog address.

3. Click Publish Post 

Tip: After publish it, you can get  URL of your contact us page. So you can add it to your
menu bar,its more relevant, because your visitors can easily get it.you can get nice menubar here
Cheers.

Sunday, 22 July 2012

10 Simple Blogger Widgets Each Blogger Should Have

Up to know i have written many posts and you might have read all of them and commented on them too. Some of them have impressed you and some may not. So realizing this here is a post for top 10 blogger widgets till now.


This list is based on pageviews, widgets usage and above all in my professional point of view. These are the most common and useful widgets in blogger market that will always be available and be free. It's better to add all of them or, better to add at least some of them. Then here is the list and it's short description. So, then here we go;

This one is my favorite. It appears in every page of your blog. It allows quick sharing to some of the common social media like facebook and twitter and stumble upon. This will help to get you traffic from social medias.
This widget will let your visitors copy a html code and paste on their site and once done a badge will appear on their site. That badge is linking on your site. So you will get one backlink for one badge. More over this will bring more traffic to your blog.
These two buttons look same but in fact are very different. Click on left link to jump to smooth scroll to top button for blog and click right link to jump to scroll to bottom button for blog. These widgets helps to make navigation pretty easy as scrolling all the way to top is just booring.
I have heard many people having problem adding paypal donate button, but here is the simplified post of adding paypal donate button. This widget allows your users to jump to your donating page helping others to donate and you to earn money.
Commenting is now made easy and simplified with disqus commenting system. Check out my post for adding it to your blog so that your blog will receive more comments.
With the all new feature you can now see yahoo smileys on blogger. Follow the tutorial so that your blog will smile with the help of smileys.
Show how much twitter followers you have by adding this widget. This widget looks good and cool and also helps to get more followers resulting expansion of your fame in social medias.
This one is the recently added one. Show your facebook, twitter and google plus status with this floating widget. More over this also doesn't occupies your blog space as well.
Twitter growing with millions of users becoming it's members and many signing up every day this social network now offers an especial widget. This widget delivers your tweets to blogger and thus opens a conversation of twitter on your blog.
With google's all new social network g+ has become a very important social network. Get more friends on g+ by adding a badge of it's to your blog. It's very simple and easy.

So froends i hoe you enjoyed this post. Be sure to grab my upcomming posts.
CHEERS!!

Monday, 16 July 2012

Adding Yahoo Smileys on Blogger Posts and Widgets

Their is no obligation to tell that you all know about yahoo. Since it is the most famous messenger and it ranks 4th on the basis of it's pageviews and users. Everybody knows about yahoo features. On of the famous feature of yahoo is the smileys. It's very good to see and works on all computers without installing any software.
Today in this post i will be teaching you the way to add yahoo smileys on blogger posts and widgets. It's quite simple as it won't take time. You Just need to add two codes one CSS and another Javascript. So here we go;

1. ADDING CSS CODE
  • Log in to your blogger account.
  • Be forwarded to your dashboard.
  • Go to design>edit Html.
  • Find the below code in it;
]]></b:skin>
  • After you find this code paste the below code immediately before (above) it.
<!-- Yahoo Smileys on Posts and Widgets by Blogging Sentral Code Start-->
img.bhsmly {
    height: auto !important;
    vertical-align: middle !important;
    width: auto !important;
    border:0px !important;
}
<!-- Yahoo Smileys Code End by Blogging Sentral-->
2. ADDING JAVASCRIPT CODE
  • Now it's turn to add the java script code. See for this code once again.
]]></b:skin>
  • Add the below code just after it;
<!-- Yahoo Smileys Script on Posts and Widgets by Blogging Sentral -->
<script src='http://yahoo-simileys.googlecode.com/files/yahoo%20simileys%20by%20blogging%20sentral.js' type='text/javascript'/>
  • Now save the template and you are done.
By this you can make smileys visible to your blog. Just enter the shortcut of it that you used to enter in IM . For eg: for a happy face the code is ":)". Like this each smileys have it's own shortcut. If you don't know then here are some of the smileys. Hope this adds taste to your blog.

 :)  :(  ;)  :D  ;;-)  :-/  :x  :P  :-*  =((  :-O  X(  :7 B-)  :-S  #:-S  7:)  :((  :))  :|  /:)  =))  O:-)  :-B  =;  :-c  :)]  ~X(  :-h  :-t  8-7  I-)  8-|  L-)  :-a  :-$  [-(  :O)  8-}  2:-P  (:|  =P~   #-o  =D7  :-SS  @-)  :^o  :-w  7:P  2):)  X_X  :!!  \m/  :-q  :-bd  ^#(^  :ar!